Squid Slowing Things Down

Ages ago when I built my first home network, I started using Squid to try and speed up browsing.  At the time, roughly 14 years ago, my roommate and I were sharing a single dial-up connection.  The theoretical 56k connection was slow enough for one person using it, let along two.  I never did any objective testing of the performance boots, but it felt faster and that’s all that really mattered.  Since this was working well and took no real work to keep up, I continued using it for 14 years and well into the world of broadband.  Recently my FiOS connection was upgraded to 35Mbps symmetrical.  Not that I use that much bandwidth, but the upgrade didn’t change my monthly bill, so I took it.  With this upgrade, I hit various Internet speed tests to see what I was really getting.  Everything I tested, within reasonable network connectivity, kept topping out around 20 Mbps.  I could understand variations in throughput over different endpoints with different network providers and such, but a consistent 20 Mbps across everything within reason just seemed odd.  I did some testing and bypassed Squid to eliminate that as a cause.  Low and behold, without squid I got my 35 Mbps consistently where I was before only getting 20 Mbps.  The server running has plenty of CPU and free memory and everything is connected internally on 1 Gbps network (previously tested to be fine).  I’m guessing something about how squid checks its cache for objects and proxies the connection causes the slow down.  Since my time is somewhat limited and the only real need for squid was to speed up things, I’ve just turned it off and removed all of the proxy configurations from the various machines in the house.

Morale of the story is that sometimes things that are supposed to increase performance don’t.  I’m sure there are plenty of use cases where using Squid can provide a better experience than not using it, but in my specific use case, without seems better.

OpenBSD 5.1 and IntelAGP Boot

I have a very old machine (Dell  OptiPlex GXa 300M EM+)  that I use for several things running OpenBSD.  For such an old machine (300 MHz Pentium II CPU), it’s been rock solid for the work I put on it.  It started life as either OpenBSD 4.1 or 4.2 and has steadily been upgraded with each release with no issues.  Well that was until 5.1.  The upgrade for 5.0 to 5.1 happened just as all of the others — completely uneventful.  The “fun” began after I booted into the freshly installed 5.1 system.  As the kernel was loading, it would almost immediately drop into ddb:

OpenBSD 5.1-stable (GENERIC) #0: Mon May 28 22:28:09 EDT 2012
   root@apophis.ext.theory14.net:/usr/src/sys/arch/i386/compile/GENERIC
cpu0: Intel Pentium II ("GenuineIntel" 686-class, 512KB L2 cache) 299 MHz
cpu0: FPU,V86,DE,PSE,TSC,MSR,PAE,MCE,CX8,SEP,MTRR,PGE,MCA,CMOV,MMX
real mem  = 402194432 (383MB)
avail mem = 385519616 (367MB)
mainbus0 at root
bios0 at mainbus0: AT/286+ BIOS, date 12/15/98, BIOS32 rev. 0 @ 0xffe90,
SMBIOS rev. 2.2 @ 0xfaa80 (59 entries)
bios0: vendor Dell Computer Corporation version "A09" date 12/15/98
bios0: Dell Computer Corporation OptiPlex GXa 300M EM+
apm0 at bios0: Power Management spec V1.2
acpi at bios0 function 0x0 not configured
pcibios0 at bios0: rev 2.1 @ 0xf0000/0x10000
pcibios0: PCI IRQ Routing Table rev 1.0 @ 0xfc650/128 (6 entries)
pcibios0: PCI Interrupt Router at 000:07:0 ("Intel 82371AB PIIX4 ISA" rev
0x00)
pcibios0: PCI bus #1 is the last bus
bios0: ROM list: 0xc0000/0x8000 0xc8000/0x8000
cpu0 at mainbus0: (uniprocessor)
pci0 at mainbus0 bus 0: configuration mode 1 (bios)
pchb0 at pci0 dev 0 function 0 "Intel 82443LX AGP" rev 0x03
intelagp0 at pchb0Stopped at	pci_conf_write+0xdf:	xorl	%eax,%eax
pci_conf_write(0,80000000,90,7080,d1317cc0) at pci_conf_write+0xdf
agp_intel_attach(d1317d00,d1317c80,d0b97ca8,d03ead8b,0) at
agp_intel_attach+0x314
config_attach(d1317d00,d09b66a0,d0b97ca8,d070ed40,0) at config_attach+0x1bb
pchbattach(d1317e00,d1317d00,d0b97d54,d03ead8b,d05a2250) at pchbattach+0x19c
config_attach(d1317e00,d09b6600,d0b97d54,d05a43c0,d0b97db4) at
config_attach+0x1bb
pci_probe_device(d1317e00,80000000,0,0,317e00) at pci_probe_device+0x420
pci_enumerate_bus(d1317e00,0,0,d03ead8b,0) at pci_enumerate_bus+0x11c
config_attach(d1316fc0,d09b5040,d0b97e58,d05a1eb0,30000002) at
config_attach+0x1bb
mainbus_attach(0,d1316fc0,0,d09b5020,0) at mainbus_attach+0x213
config_attach(0,d09b5020,0,0,d0a25f40) at config_attach+0x1bb
ddb>

Simply continuing out of ddb would allow the system to finish booting and running as normal.  Google searches didn’t really turn up much and my post to the OpenBSD Bug list didn’t get any attention.    I’m far from a kernel developer or debugger, but after reading a bunch emails with similar booting issues, reading a number of man pages and some trial and error, it seems that the 5.1 GENERIC kernel and this machines AGP chips don’t get along so well.  The solution was to disable the intelagp driver in the kernel.  With this disabled, it’s back to booting normally with no ddb fun.

To make the kernel changes I just used config(8) to modify the existing kernel. A summary of the steps I used are (read the man pages before doing this!):

  • Boot the system with GENERIC
  • Follow the KERNEL_MODIFICATION section of config(8) 
  • # config -e -o bsd.new /bsd
  • disable intelagp
  • quit
  • Boot the new kernel.
 
And now happiness has returned to booting this old box!

Dovecot IMAPS Proxy with OpenBSD 4.8

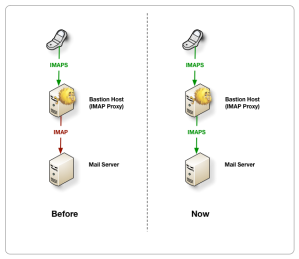
In a previous article, I discussed setting up an IMAP proxy to get mail remotely from my iPhone using Doevcot.  The one part of the set up I never really liked is that the link from my bastion host acting as a proxy and my actual mail server had to go un-encrypted.  Granted this was inside my network and if someone was sniffing the transaction off the wire I had bigger problems, but it still bothered me as less than perfect.  While I could have grabbed a Dovecot RC source tarball and had the feature, I preferred to stay with what was packaged with OpenBSD and have lived with the lack of encryption inside my network.  Well I finally (OK, just a month and a half since release) updated my inbound proxy to OpenBSD 4.8. and one of the prominent notes on the upgrade is a move to Dovecot 1.2.x.  This upgrade allows encryption of the proxied connection and resolves that long-standing concern I’ve had.

Assuming your internal mail server is already listening for IMAPS connections, you only need to modify the “extra-fields” in your /etc/dovecot.passwd file to get encryption of the proxied connection.  For example:

bubba:{PLAIN-MD5}31337::::::proxy=y host=192.168.5.6 ssl=any-cert port=993


Before and After

Before and After


Is Twitter really something new?

While I’m on the topic of poorly re-invented applications, I’ll take a quick shot at Twitter (in a tweet-length post).    Is this really anything more than finger and keeping your .plan up to date?

ChromeOS: nothing new, just a re-hash of what was done better before

I was just reading a few articles and watching a couple of videos about Chrome OS and the Cr-48 laptop.  From what I’ve seen this is pretty much a netbook that boots and loads a browser as your UI.  You do everything from within the browser including additional “applications” that you install in the browser.

As I watched this I immediately thought of Emacs and the jokes about Emacs being a nice operating system.  Let’s see, Emacs has been ported to many different operating systems (many more than the Chrome browser and not tying you to ChromeOS), has many different forks incase you would like something a little bit different than the GNU version, has a rich library of extensions and packages (like the Chrome Web Apps), contains a scripting language to customize or further extend it, and some people even use it as a text editor.  This sounds a lot like what Google is trying to do with Chrome without the added “benefit” of making sure your eyeballs land on Google web properties (ad placement, user tracking, etc).

The other big hype about Chrome OS seems to be that you can get to your data from anywhere.  You just fire up any copy of the Chrome browser on a regular computer or your ChromeOS laptop, log into your Google account and everything is there.  All of your applications and all of your data available anywhere.  All of it tucked away on Google’s servers for them to mine, use to target you with advertisements, better track you, and if they ever need a bunch of cash, to sell.  The universal access to your data is, like Emacs, nothing new; though, selling your soul and identity for it is.  Before the Internet was prevalent (or existed) you could use a modem to connect to your computer from anywhere that had a phone line and fire up your copy of Emacs and run all of those great applications and extensions in it.  Today, this is just as easily accomplished with an SSH client and internet connection instead of a modem and phone line.  SSH clients are available on a far larger number of platforms than is ChromeOS.  It’s a default part of Mac OS X, pretty much every Linux distro (don’t know about ChromeOS or if it is even considered a Linux distro), all of the BSDs, and with a copy of PuTTY (a single file) on a USB stick, it’s available on any Windows machine you encounter.  The best part is that all of your information is on your own computer safe from any data mining.

So far all of the hype about this revolution that Google has created, all they have done is re-invented what has been around since the mid-1970s.  I’m sure there are many examples other than the ones I chose, but it all comes down to a quote “Those who don’t know history are destined to repeat it, poorly”.

P.S.  I’m a vi user.

Moving the Blog

I’m just finishing up moving this blog from Blogger to WordPress.  I can see that some of the word wrapping didn’t translate so well in some of the posts (code snippets in particular).  I’ll try to go back and fix then, but I apologize in advance if something is hard to read.

Disk Drives for Mac Video Editing

Following a number of video editing forums, the question of what kind of disk should be used, often comes up. I’ve seen this general question come up a lot on the forums — “Is my disk OK? What kind of disk do I need?” There are a lot of good answers to these questions that get people working quickly, but I thought I’d take a little bit and explain a bit more of the “why” and “how” this all works. I’m going to keep this at somewhat of a high level and limited to what we would typically put in our Macs.
Fundamentally, you are concerned with two basic properties of the system:
  • How fast you can get data to/from the disk
  • How fast the disk itself can read/write that data
First, how fast can we get data to/from the disk. This is governed by the interconnect technology used to connect the CPU/Memory to the disk. On a typical Mac, you have a few options:
  • SATA (Serial ATA): This is what your internal hard drives are connected with. This can nominally push data at 3 Gbits/s (3072 Mbits/sec). SATA was designed for hard drives.
  • eSATA: Simply SATA with special connectors to support external disk enclosures.
  • USB: This will nominally push data at 480 Mbits/sec. Due to the way USB works, it can have performance issues keeping up performance transferring large amounts of data — expect to see half or less of the nominal rate. USB was designed as a general peripheral connection technology — not necessarily optimized for disks storage.
  • Firewire (IEEE 1394): Comes in two versions, FW 400 (nominally 400 MBits/s) and FW 800 (800 MBits/s). Firewire was designed to support disk storage along with other audio/visual connectivity protocols.
The disks themselves… So what are the important parameters to look for in the disk itself:
  • Rotational Speed: This is how fast the drive spins. You will typically see two different speeds 5400 rpm and 7200 rpm. There are increasingly “green” drives appearing on the market which I’ll discuss briefly later. Hard drives have spinning platters (disks) and a set of read/write heads inside them. This isn’t much different than a phonograph with the disks being the vinyl record and the read/write heads being the needle. To access a bit of data, the heads have to move to a specific radial position and then wait until the write spot is spun underneath them. Remember that data (your files) is, to various degrees spread all over the disks. When you read or write a lot of data the heads are constantly repositioning and waiting as right data passes under them. Think of trying to listen to several songs at the same time on a vinyl record and you get the idea.
  • Cache: Disks have cache on them that can speed up read and write operations. Bigger is generally better, but cache is only so good.
  • Data Transfer Rate: This is fundamentally a function of the rotational speed, but it tells you how fast the disk can actually read/write. Each disk has different specs, so you have to check the disk you’re considering. Also be very careful as to exactly what performance is being reported by the manufacturer and make sure you are doing apples to apples comparisons.
Now to tie it all together. You’re speed is going to be limited by the slowest part of the chain. If you put a slow disk with a fast interconnect, you’re limited by the slow disk and vice versa. In practice, the slowest options of the above are USB and 5400 rpm drives. Either SATA or Firewire has a higher data rate than the 7200 rpm disk can sustain. The other thing to consider is how many concurrent IO operations you are sending to the disk. Your system disk (Macintosh HD) has to service all of the other IO needs of your system. If you add your video editing demands to this, you could overwhelm the drive.
I think there are a few common problems that people run into:
  • The MacBook Pro’s standard drive is a 5400 rpm disk. This is probably going to be too slow for most video editing demands, especially when you add additional IO demands. It will “work” but you probably won’t be happy.
  • Disk is too full. You need to leave 10% – 20% of your disk free. The OS needs this free space to easily organize the data it’s writing to disk.
  • Just sending too much IO to a single disk. A single disk can only handle so much IO. Once you go over that, you wait (or drop frames).
The most common solution is to use a 7200 rpm disk connected by Firewire. 7200 rpm because it’s the fastest you’re going to reasonably afford and Firewire because it’s fast enough and every Mac (maybe not the MacBook) has it. If you have a MacPro, you can look at adding more internal SATA drives (consider RAID’ing them for more performance) or look at eSATA (need to buy a controller in addition to disks).
If you’re in a bigger setting with shared storage arrays, you have even more options and things get even more complicated. I’ll not going into that here, but am happy to discuss in more detail if anyone is curious.
P.S. What about those “Green” disks — I want to be nice to the environment. The Green drives that are becoming popular work by dynamically changing speeds based on demands, with their primary goal to save power and thus run at slower speeds. When you start sending data to these disks, they typically have to spin up from some nominal lower speed to something faster to support your IO. You pay a penalty (wait) for the spin up and are at the mercy of the drive to decide if it wants to spin up to full speed. These are great for longer term storage for data infrequently used (say a Time Machine disk, Aperture Vaults, iTunes music collection, or just online archive storage of files (vidoe or otherwise)) but not for something needing consistent, fast throughput, say Video Editing.

Automating SSH Tunnels on Mac OS X

There are a number of packages out there that put a nice GUI over creating and managing SSH tunnels on Mac OS X. While these are great if you aren’t already familiar with SSH, how to do this all from the command line and really aren’t interested in learning, if you are, they may be a bit of overkill and may be a bit restrictive in what you can do.

I finally got a Mac at work (my company’s Corp IT group is becoming a bit more enlightened and accepting that more than just Windows exists in the world) and I want a simple way to spin up SSH tunnels, close them down not have to keep a terminal window open for them. My solution is to wrap some Applescript around the SSH commands and launch my tunnels from the script menu on the menu bar.
The simple script:
do shell script "ssh -4 -A -N -L 12345:localhost:12346 host.example.com &> /dev/null & echo $!"set sshpid to the resultdisplay dialog "ssh PID is: " & sshpid buttons {"Close Tunnel"}do shell script "kill -9 " & sshpid

When the tunnel is created, a window will pop up giving you the pid of the ssh process and a button to close the tunnel. When click the “Close Tunnel” button, the tunnel is shutdown by killing (with the mean -9, chose the signal you want) the ssh process.

Now my most common need/desire for a tunnel is to listen to my music stored at home on my machine at work. At home I use Firefly Media Server to share my library so I just want to tap into that at work. A quick google search shows the steps to do this:
  • Use dns-sd to register a daap servers on local host
  • Create an ssh tunnel from localhost to the remote daap stream
The script is (my ssh tunnel bounces through a couple of different hosts):

do shell script "dns-sd -P my-music _daap._tcp local 3690 localhost.local. 127.0.0.1 Arbitrary &> /dev/null & echo $!"
set dnssdpid to the result
do shell script "ssh -4 -A -L 3690:localhost:9999 host1.example.net ssh -l remoteuser -A -L 9999:localhost:9998 192.168.10.3 ssh -A -N -L 9998:localhost:3689 host2.example.net &> /dev/null & echo $!"
set sshpid to the result
display dialog "Music Tunneldns-sd PID is: " & dnssdpid & "ssh PID is: " & sshpid buttons {"Close Tunnel"}
do shell script "kill -9 " & sshpid & " " & dnssdpid

This script starts both dns-sd and the ssh tunnel and when closes them both down when the “Close Tunnel” button is clicked.

To run this easily, enable the Script Menu in the menu bar (via AppleScript Editor preferences) and put the script in~/Library/Scripts.

Snow Leopard — First Impressions

I was planning on picking up Snow Leopard (Mac OS 10.6) next weekend, but we were by the mall yesterday, so I went ahead and picked up a copy. My initial plan was to wait a week and let any major issues be discovered before I did my upgrades. Of course, I couldn’t let it sit around for a week, and with multiple backup systems of my machines, I installed it last night. My initial experience and impressions are:

  • The upgrade process took 22 minutes and consisted of 3 or 4 mouse clicks and a reboot.
  • I have a number of SMB shares mounted from a server running Samba. I had to change the security setting to “user” where it had been “share”.
  • The upgrade performed by the installer overwrote my /etc/snmp/snmpd.conf file. This prevented any snmp monitoring from working until I figured out what went wrong. (The installer also re-enables the OS X firewall even if it was disabled before — probably a good decision)
  • It seems that Image Capture has gotten significant improvements with 10.6 — I haven’t noticed this called out by any of the other reviews. The UI is much more feature-full and even offers the option to delete images and videos from my iPhone. (If this was in the previous version, I hadn’t noticed it.)
  • Boot time is noticeably faster.
  • I ended up saving about 10GB of disk space as part of the upgrade
I’ve only played with Snow Leopard for a few hours, so I expect to find out more things as I get more time with it.

Getting mail on my iPhone

We got our iPhones 3GS on the launch day, and I spent part of the weekend getting mail working right. I did hit a few issues, but I have everything working acceptable now. This is all based on my previous post on configuring a mail proxy.

The issues I hit were:

  • Can’t seem to get the phone to connect on a user specified port for either IMAP or SMTP. There are options for that, but I could never get my phone to (reliably) use them.
  • I could never get starttls to work with the iPhone. Other clients, mail.app, worked just fine. This is annoying, but not such a big deal. The password for the login is still encrypted and the mail itself would normally be going outside of my systems anyway.
  • There is no “advanced” or “expert” UI for initially setting up email accounts on the iPhone (nor on mail.app). This means that you have to wait as the phone walks through a lot of default mail options (ports to connect on, SSL or no SSL, etc) before you get a chance to adjust anything.
So here are the steps. There was some bit of trial and error, but I tried to record everything accurately.
  1. Before you try to setup any mail accounts on the phone, you should import all of your self signed certs to the phone. To do this, simply upload all of the certs, renamed to something.crt to a web server and then load that site in Safari on your iPhone. That means to put the .crt files into a directory you can access from your phone (or any browser), not to use the certs to SSL encrypt the site. When you load each of those files in Safari (like going to http:///your.site.tld/file/mycert.crt), you’ll get a new application to import the cert into your profile.
  2. Now create the accounts on the iPhone as you would otherwise. The settings for your connections are:
    Connection Username Authentication SSL
    Incoming username Password On
    Outgoing username@domain CRAM-MD5 Off

  3. When making the initial IMAPS connection, you will be prompted to accept the certificate. Click to continue/accept the cert. I would have thought that importing the certs to my phone’s profiles would have taken care of this, but it didn’t. Of course there is probably some nuance of PKI that I don’t grok (feel free to enlighten me if you know the details).
  4. After much waiting as the phone tries various incarnations of SMTP connections, you’ll get prompted to attempt to proceed un-encrypted. Say NO here. If you say “yes”it seems to screw up the IMAPS connection that is actually working fine at this point.
  5. Now go into the mail settings and fix the SMTP connection to work right. Turn off SSL and set the authentication to CRAM-MD5.
  6. Open mail on the phone and you should mail working fine. Try reading some of your mail and try sending some to make sure it all works right.
That’s about it. This is far from perfect, but seems to be working reliably and the boss (wife) approves. If someone has details on how to make this better or more efficient, please let me know.